Posted by Cyrus-Shepard
If your websites are like most, they include a fair amount of extra "stuff" in the title tags: things like your brand name or repeating boilerplate text that appears across multiple pages.
Should you include these elements in your titles automatically?
To be fair, most sites do.
Alternatively, could it help your SEO to actually include less information in your titles? (Or at least in specific circumstances?)
We know from a handful of studies that titles of a certain length tend to perform better. A now-famous study from the engineers at Etsy showed how shorter titles performed better than longer ones. SEOs speculate that this could be because shorter titles can have more focused relevancy (by focusing on core keywords), might earn higher click-through rates, or some other reason we can't imagine.
When choosing which part of a title to shorten, brand names and boilerplate text are obvious choices. But how do you determine if this is something you should consider for your own SEO?
Here's an example of a brand's site name at the end of every title:
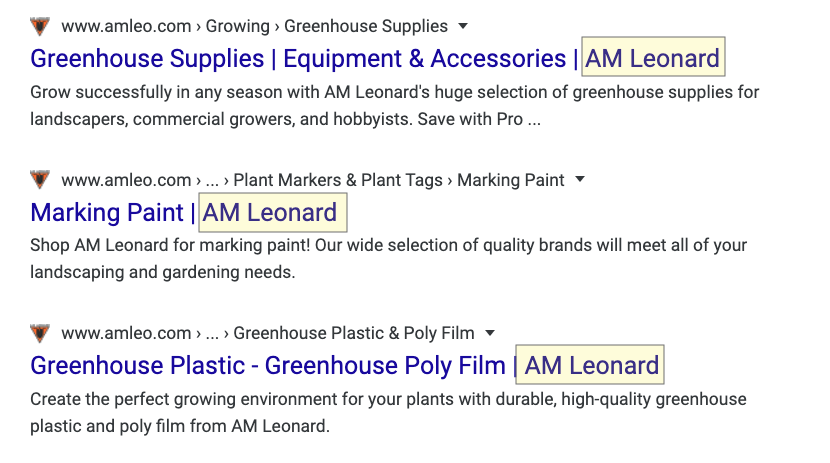
We've all seen sites like this. Heck, most of us do this on our own sites. The question is, does having our brand/site name at the end of every title actually help, or hurt?
But first, we also have to consider other types of boilerplate.
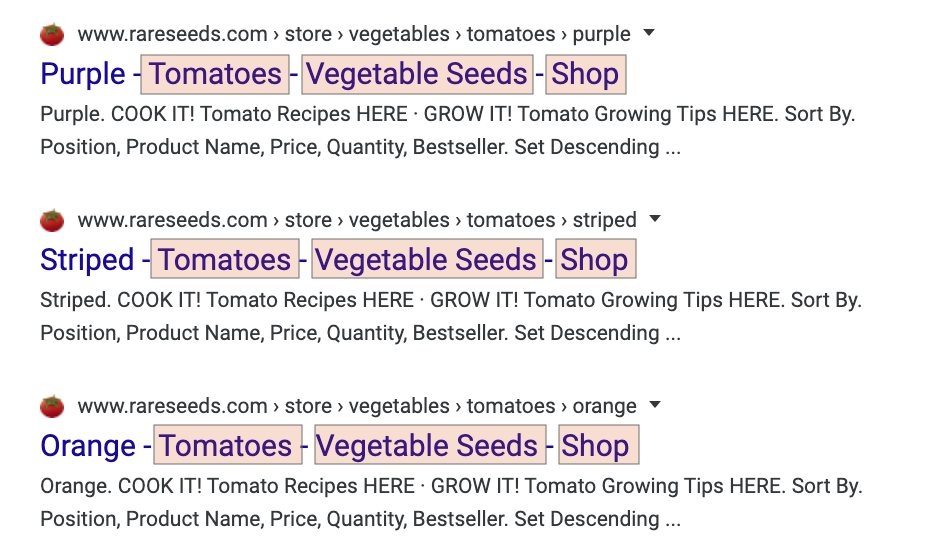
What is boilerplate? Boilerplate simply means standardized, non-unique pieces of text that are used over and over again. This often includes things like categories, product categories, author tags, and taglines.
In this example below, the boilerplate text on every title includes "Tomatoes - Vegetable Seeds - Shop."
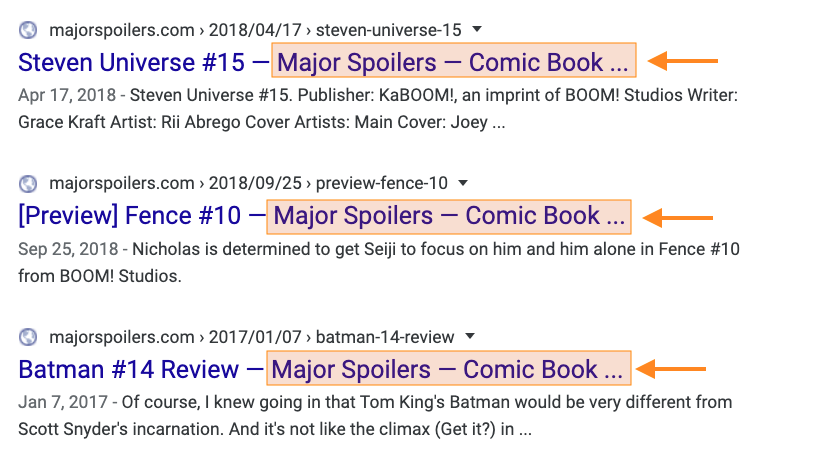
Sometimes boilerplate material can become quite long. The comic book review site Major Spoilers (awesome name!) often includes the same 65-character boilerplate on many pages:
"Major Spoilers – Comic Book Reviews, News, Previews, and Podcasts"
Of course, at this length, it's so long that Google truncates every single title:
The problems that boilerplate can cause your SEO are threefold:
- Relevancy: Unnecessary words can make your title less relevant, both to search engines and users. For search engines, this could mean lower rankings. For users, this could result in fewer clicks.
- Uniqueness: Titles that share the same repeating text, and only vary from one another by a word or two, aren't very unique. While this isn't necessarily a problem, it goes against most SEO best practices, where uniqueness is key.
- Length: Boilerplate means you have less room to display other words in your title, and Google will often cut these off if they go beyond a certain length.
Experiment #1: Remove category from title
We decided to run a couple of boilerplate experiments here at Moz, to see if we could increase our rankings and traffic by removing some of the repeating parts of our titles.
We started with our Whiteboard Friday blog posts. Every time Moz publishes a new Whiteboard Friday, we traditionally include "Whiteboard Friday" in the title.
What would happen if we removed this from the titles?
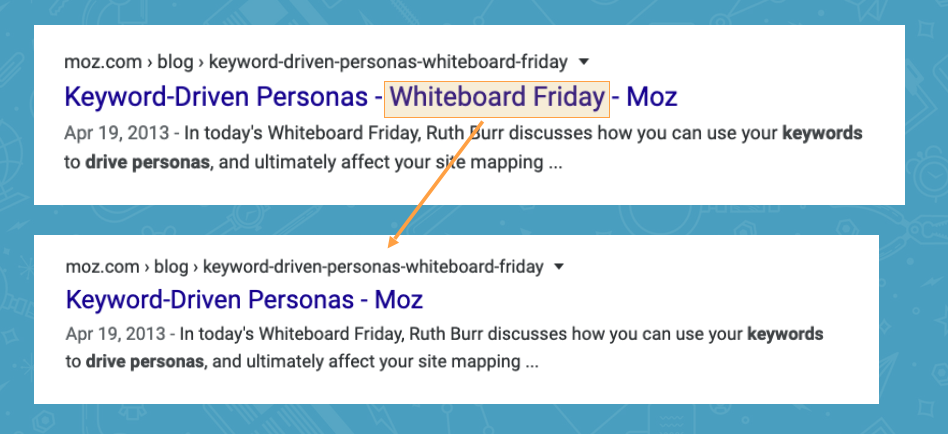
Using an A/B split test methodology — where we rolled the test out on 50% of the titles and used the other 50% as a control — we saw an amazing 20% uplift from this experiment.

This chart represents the cumulative impact of the test on organic traffic. The central blue line is the best estimate of how the variant pages, with the change applied, performed compared to how we would have expected without any changes applied. The blue shaded region represents our 95% confidence interval: there is a 95% probability that the actual outcome is somewhere in this region. If this region is wholly above or below the horizontal axis, that represents a statistically significant test.
Honestly, the results surprised us. Whiteboard Friday is a popular brand (so we thought) but removing this boilerplate from our titles produced a significant uplift in traffic to those pages.
At this point, we got cocky…
Experiment #2: Remove brand from title
If removing the category name from Whiteboard Friday posts produced such a significant uplift, what if we removed our brand name from all titles?
For this A/B experiment, we did exactly that—removing the word "Moz" from 50% of our titles and measuring the results.
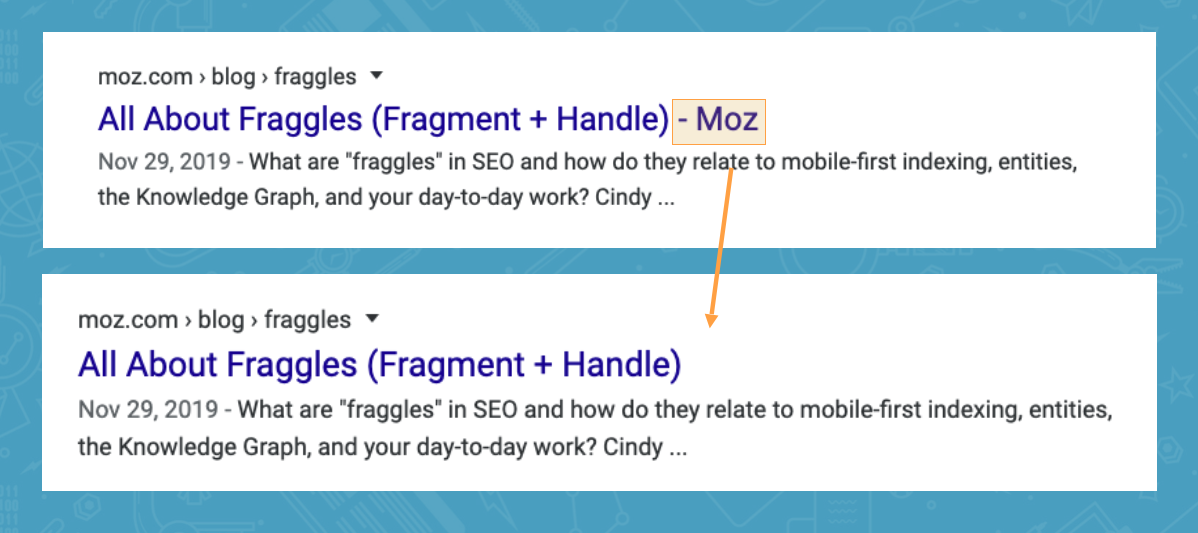
Crazy, right? If it worked by removing "Whiteboard Friday" would we see the same uplift by removing "Moz?"
Sadly, Google had other plans:
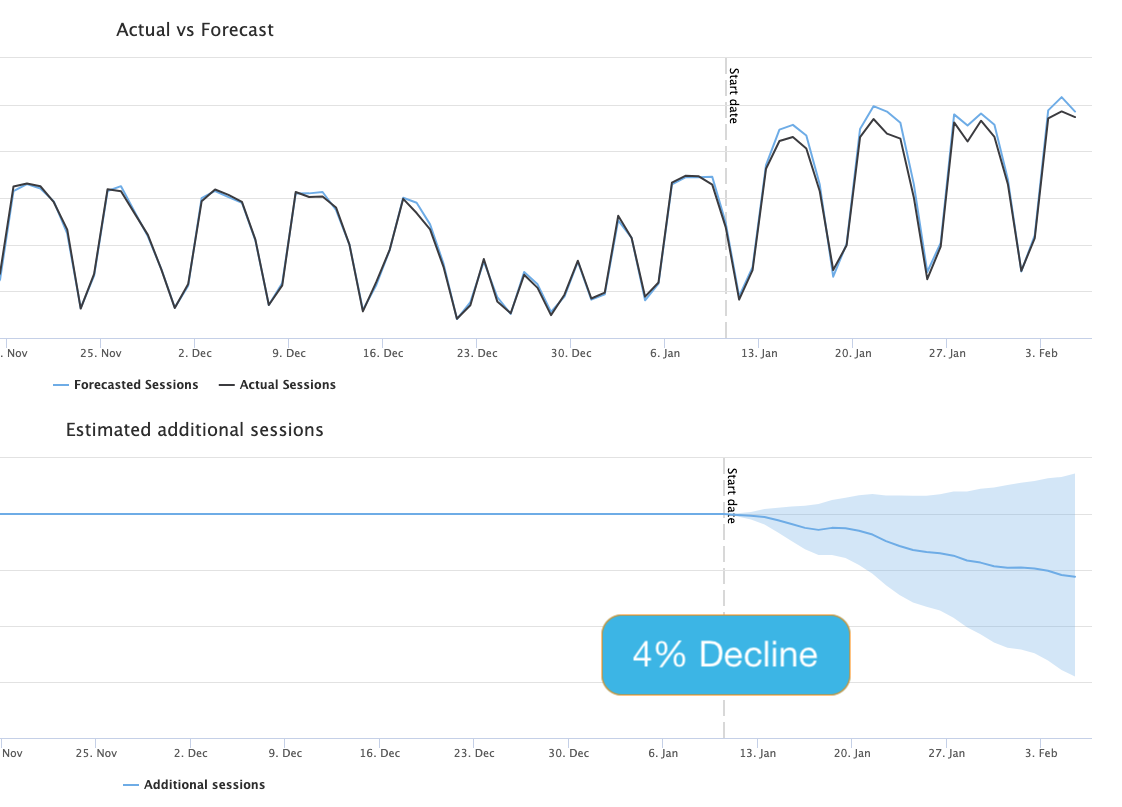
While this A/B test never reached full statistical significance, we actually saw a 4% decline in traffic by removing our brand from our title tags.
Boo!
So why did this test not produce the same gains? To be honest, I've removed the brand name from other site's titles and seen as much as a 20% uplift.
It turns out that whether or not removing brand/boilerplate will be beneficial to your SEO depends on a few key factors, which you can gauge in advance.
How to know if removing boilerplate may succeed
Over 10 years of experience and literally millions of title tags, I've found that there are basically four factors that influence whether or not removing boilerplate from your titles might be beneficial:
- Brand Strength: Popular brand names in titles almost always perform better than unknown brands, even when people aren't searching for your brand specifically. Amazon's brand recognition, for example, likely gives a significant boost to including "Amazon" in every title, even when people aren't specifically searching Amazon. Less recognizable brands, however, don't always get the same boost, and can actually lead to fewer visits based on relevancy, length, and clickability (described next.)
- Relevancy: Are your boilerplate/brand keywords relevant to what your users search for? For example, if you're site is about television repair, then boilerplate titles that say "Brad's TV Repair" are going to be much more relevant than boilerplate that simply say "Brads." (We'll explore a way to determine your boilerplate's brand strength and relevancy in the next section.)
- Length: In general, long boilerplate has the potential to do more harm than short boilerplate/brand words. Long boilerplate can dilute the relevance of your titles. So if you include "Buy Brad's TVs, Television Repair, High Definition Servicing, Audio and Visual Equipment for Sale in Houston Texas and Surrounding Areas" - you may want to rethink your boilerplate.
- Clickability: Sometimes, boilerplate can make your titles more clickable, even if they aren't terribly relevant. Words like "Sale", "Solved", "Free", "2020", "New", and many others can lead to an increase in click-through rates (CTR.) Sometimes you can't tell until you test, but in many cases even adding clickable elements to your boilerplate can lead to significant gains.
Simple technique for determining your brand strength and boilerplate relevancy
This simple technique will also show why removing "Whiteboard Friday" led to an increase in traffic while removing "Moz" from titles did not.
Here's what you want to do: for each piece of boilerplate, determine the number of URLs on your site that rank/receive traffic for those keywords.
For this, we'll use Google Search Console.
Simply enter your boilerplate/brand as a query filter (you may need to break it into chunks for longer boilerplate) and see how many URLs receive traffic for queries that include that keyword.
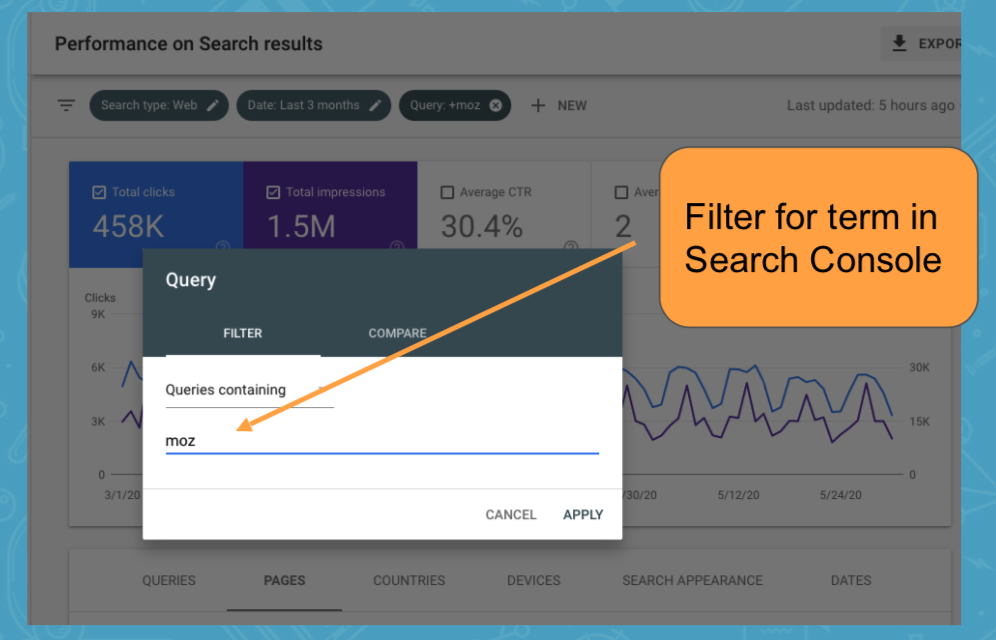
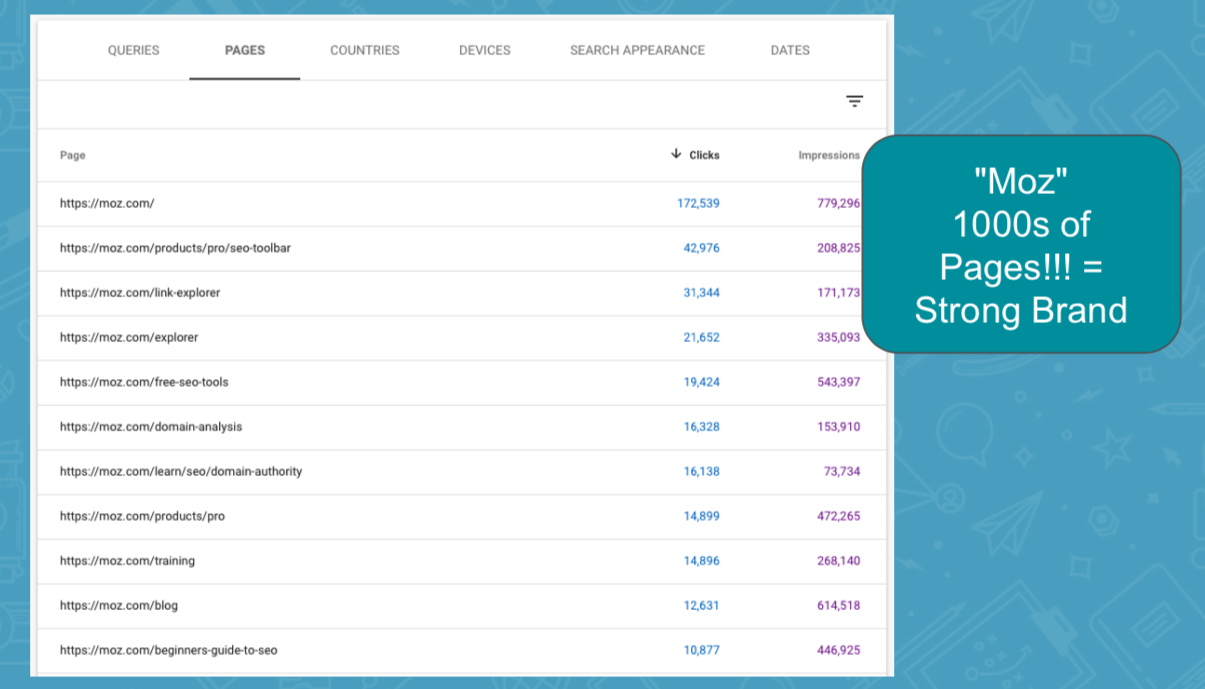
When we filter for keywords that contain our "moz" brand name, we find thousands of ranking URLs.
People are searching for things like:
- Moz DA Checker
- Moz Pro
- Moz SEO
- Moz Blog
- Etc., etc.
As our brand name is part of so many queries and leads to visits across thousands of pages, this tells us that "Moz" is a very strong brand, and we'd likely be smart to include it as part of our title tags.
"Moz" is also very short at only 3 characters, which doesn't hurt either.
So what happens when we try this same technique with "Whiteboard Friday" — the boilerplate that led to a 20% uplift when we removed it? We see a very different result:

In this case, almost all the traffic for "Whiteboard Friday" search terms goes to only one or two pages.
For most Whiteboard Friday posts, the term is simply irrelevant. It's not what people are searching for, and the brand isn't strong enough to produce additional uplift.
Also, at 17 characters long, this boilerplate added significant length to each of our titles, in addition to possibly diluting the relevancy for what the posts were ranking for.
Final thoughts + bonus free title tag webinar
These tips can't tell you definitively whether you should or shouldn't include boilerplate or brand in your title tags, but they should give you a pretty good idea of when you should test things out.
Remember: Always test and evaluate before making any SEO change permanent. At least know the impact of the change you are making.
Also, please don't be under the impression that you should always remove boilerplate from your titles. In some instances, actually adding boilerplate can produce an uplift, particularly when the boilerplate is:
- Recognizable: For example a strong brand
- Relevant: The right keywords
- Clickable: Encourages a high CTR
- Succinct: Not overly long
If you found value in the tips, and want to learn even more ways to optimize your title tags, we've made available a free webinar for you: SEO Master Class: Advanced Title Tag Optimization (For Any Site).
If you've got 40 minutes, it's definitely worth a watch.
Best of luck with your SEO!
Sign up for The Moz Top 10, a semimonthly mailer updating you on the top ten hottest pieces of SEO news, tips, and rad links uncovered by the Moz team. Think of it as your exclusive digest of stuff you don't have time to hunt down but want to read!